Published: February 9, 2021
It’s likely there’s someone in your life who functions by the idiom, “A place for everything and everything in its place.” Often this advice comes too late, when we’ve already lost something, or when it’s being used to chastise us for leaving something out. While we might not adhere to this saying in our homes, in shared workspaces or warehouses, where finding things quickly matters, we should be paying more attention.
How you design your warehouse layout is more involved than simply finding where things fit. It’s not like packing the car for a trip where everything eventually comes out at once. While how much space you have is certainly a factor, there’s far more to it than that.
Quick Links
- What Is a Warehouse Layout?
- 3 Benefits of Creating a Practical Warehouse Layout Design
- 5 Aspects to Consider While Designing Your Warehouse Layout
- How to Design Your Warehouse Layout in 5 Steps
- 4 Warehouse Layout Design Examples and Benefits
- How CAVU ERP Helps You in Your Warehouse and Beyond
What Is a Warehouse Layout?
In simple terms, warehouse layout is the design of the physical space within, outside, and around your warehouse building. The way you organize this layout directly impacts how efficient your team is in managing fulfillment and properly keeping track of your inventory.
Benefits of Creating a Practical Warehouse Layout Design
The goal of any storage system, whether personal or business, is to create a system that enables those with access to find what they need quickly so they can move on to the next step.
Warehouse layout design is no different. Your warehouse is like a functioning part of your team, and if it’s disorganized, it has the potential to delay tasks, creating service issues and costing you money. This is why developing a sensible layout is vital to the success of your business.
Here are three advantages of streamlining the design of your warehouse.
1. Save Time and Money With the Perfect Layout
Enabling your associates and team members to find and easily access the items in your warehouse saves you both time and money. The faster they can find the items they need, retrieve them, and deliver for loading, the quicker your distribution process begins.
Further, research suggests that during an eight hour shift, your average worker spends at least 15 minutes wasted due to inefficient layouts and workflows. Over the course a year, for 50 workers, that’s 3000 hours. There’s no need to point out how costly 3,000 hours of time could be to your bottom line. Even if shaving a few seconds of time off a workflow seems like nothing, it adds up in the end. How you design your warehouse can easily help you save time and money.
2. Create a Stress-Free Environment for Your Team
Can you recall the last time you were late but couldn’t find your keys or wallet? When you’re under a deadline and required steps are interrupted by even just a few moments, it can create a lot of stress. Disorganization can, similarly, cause a lot of frustration. Frustrated and stressed workers are not only prone to making more mistakes, which in a warehouse could result in injury, but they’re also more likely to impact morale. Low morale, in turn, decreases productivity and impacts your bottom line as well.
There’s no reason why a standard part of their job should cause stress. How you design your warehouse can help alleviate employee frustration and stress, enabling workers to be more efficient.
3. Achieve Smarter Inventory Management
How you design your warehouse also has the potential to improve your inventory management. High visibility and easy access to inventory means that your team is far more aware of inventory levels. Poor inventory management impacts your bottom line in a multitude of ways, and, depending on your industry, a failure to monitor can result in significant losses.
Additionally, your warehouse can fill up quickly with items that just aren’t moving if this process isn’t accurate or efficient. To maintain a steady cash flow, you have to ensure that products are moving in and out based on demand, and to do that, you’ve got to make sure your team can take accurate inventory.
5 Aspects to Consider While Designing Your Warehouse Layout
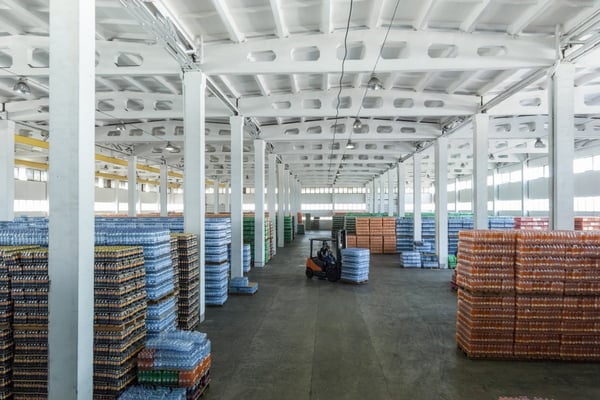
It’s easy to look at a warehouse and assume that all designs are equal, but when we break it down, there are a few vital elements to consider. Some of these aspects will depend on your business or industry while others are just best practice across the board.
1. Space
Obviously, the first thing you want to consider is the space you have. These days, the market offers plenty of modular shelving and building options, so figuring out how to best use the space is crucial. You’ll need to include space for all areas, from reception and dispatch to picking and storage. Additionally, if the building is an existing structure, you may be limited by existing structural features.
2. Flow
Along with space, you’ll want to consider workflow. People and products will need room to move. Consider what areas work together to limit time wasted moving between those areas, and the same goes for product storage. While long aisles look great, for flow you’ll want to include breaks in those aisles to improve movement. Think more like a grid and city streets than grocery aisles.
3. Access
In considering movement, you’ll also want to factor in access. Who and what equipment needs to move through your space? Accounting for forklifts or other vehicles and machinery, how much room will you need between shelving? Further, here’s where you’ll want to consider inventory needs as well. Obviously, you want to take into consideration product velocity. Items that move quickly should be easier to access.
4. Site
The site or location of the warehouse can significantly impact your design. For example, if the warehouse is situated in a location prone to flooding or other issues, you’ll want to consider how that may impact your usage. This may impact your floor design as well as building design and may require adjustments to negate the impact of poor drainage or water, which can damage products.
5. Regulations
Worker safety should be paramount to your design decisions. Not only are you required by OSHA and local regulations to ensure worker safety, but avoiding costly workers' compensation lawsuits or payouts is fundamental. Not only do workers who feel safe feel better about the workplace, but those same safety precautions improve their efficiency. Ensuring that your workspace will meet all of these requirements will factor greatly in your design, especially if using modular setups or mezzanine structures.
How to Design Your Warehouse Layout in 5 Steps
Now that we’ve got an overview, let’s take a look at some of the concrete steps you’ll want to use when designing your warehouse layout.
1. Create a Schematic
If you’ve got access to or a copy of the warehouse blueprint, this step is a bit easier. If it’s a buildout, you should have it, but if you’ve purchased it, or if you’re renting it, check with the owners to see if there’s a copy available. If not, you can create the same schematic on grid paper using a ratio of 1 box = 1 sq. ft.. You want to be sure, regardless of the method you choose, that your measurements are accurate so you can maximize your space usage.
You may wish to make multiple copies of the blueprint or lay tracing paper over the grid/blueprint itself so that you can test out various configurations and try different schemes depending on different needs, principles, or input from others.
Alternatively, there are design layout applications available that, a bit more easily, allow you to draw out potential layouts. If this is affordable for you, this is a great option!
On these schematics, you want to make sure you note immovable features such as stairways, support beams or columns, doorways, windows, and any built-in equipment so you can account for those in your planning.
You’ll want to make sure you block out space for the areas you’ll need, specifically office space, and you’ll likely want to consider the best area for access to the office from other areas of the warehouse, such as reception, shipping, and receiving.
Regardless of the schematic method you choose, this planning stage is of the utmost importance. Once shelving, equipment, and any modular pieces have been brought in and you start putting things in place, changing the plans or schematics becomes very difficult and labor intensive.
2. Plan for Efficient Use and Focus on Your Key Space Need
Once you have mapped out the general space you’ll have to work with, you’ll want to consider the type of business you’ll be using the warehouse for as this will dictate some of the utilization choices you’ll need to make. For example, if you’re doing storage and shipping, your layout will reflect that and consider the most efficient way to bring in items from receiving and pick and deliver items to shipping.
Efficient use means identifying the key spaces your warehouse will need. In the example of a storage and shipping facility, your key spaces will include shelving and pallet storage. This is your primary key space and should be accounted for. Figure out what your primary space needs are and build around that. If for example, you are in manufacturing, your primary key space is likely a production workspace rather than storage. Again, build in this key space first and work around it.
3. Create Zones and Workflow
Once you’ve mapped out the built-in features you need to work around, your office area, and your key spaces, the next thing you want to consider is how workers and how materials, goods, and finished products need to move around the warehouse space. This is your workflow.
As noted, you’ll want to always keep safety measures in mind. While adhering not only to OSHA standards and regulations is necessary, bear in mind that safe workspaces also increase productivity and improve worker satisfaction.
It will be best, for this portion, to consult with individuals who currently work in your production areas to assess the amount of space needed for workstations, materials storage, and movement of goods. Leaving these folks enough space will improve the workflow as well as safety precautions.
For storage and shipping, you’ll want to make sure you leave enough room to adequately move equipment through spaces and to maximize the speed and efficiency of delivery, while being cognizant of safety concerns as well. More specifically, you’ll want to consider aisle spacing and layout. As noted above, look into using a city-like grid as opposed to a long aisle, and consider the size of forklifts and other equipment when determining the aisle width.
4. Identify Storage Areas
A fundamental piece of workflow relies upon the proximity of items your team will need for their workstations, particularly in manufacturing or distribution. Raw materials required for production should not be stored across the warehouse, unless there are other factors weighing on that choice, such as special storage requirements (refrigeration, hazardous materials, etc.). You’ll want, for that reason, to map out storage areas last, based on the location of other areas in the warehouse.
Finally, you’ll also want to consider the movement of these items through the warehouse, so again, you’re looking for opportunities to decrease the time and space people and things will need to cover. Furthermore, you’ll want to consider any storage areas that might be high traffic and could, then, cause a bottleneck.
5. Test Your Layout and Flow
In a perfect world, we’d be done knowing that all of our measurements are exact and that we’ve been strategic and thoughtful in considering the layout. However, no business would open without a dry run, meaning you want to test that this layout works before you begin installing equipment, shelving, and other necessary fixtures.
Using masking tape or chalk, map out where items will go. This doesn’t need to be exhaustive, but it should include your primary workstations and key spaces. Then, test the pattern. Move through it on foot, move items (carts and pallets), and have your team do the same. Employees who will use the space daily will provide valuable feedback about any spacing issues, potential bottlenecks, or workflow issues.
And lastly, double and triple check areas that will be “locked down” once in place. While changing any aspect of the warehouse design will be labor intensive, certain areas, depending on your industry, may be virtually immovable once put in place.
4 Warehouse Layout Design Examples and Benefits
While your warehouse is a blank slate and might initially seem limited only by what you can imagine, in practice there are a few standard designs that most warehouses use to maximize efficiency.
The U-Shaped Design
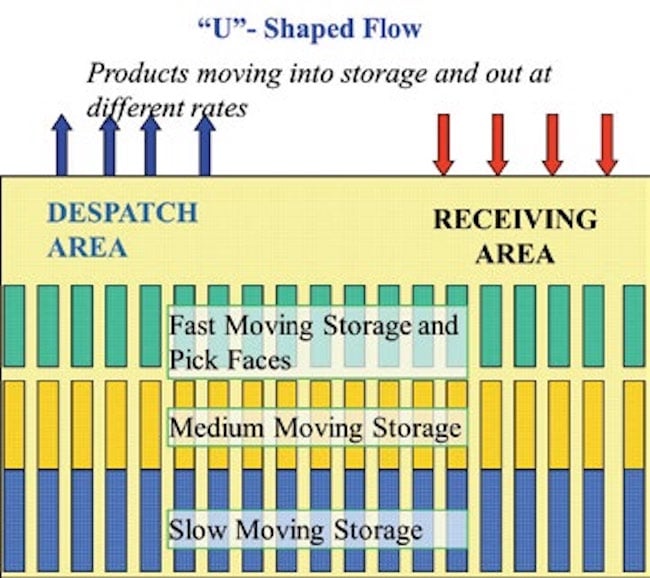
There’s the U-design, which capitalizes on shipping and receiving docks located next to one another. This design allows you to share employees and machinery across both warehousing functions, minimizing wear and tear on equipment and speeding up both processes.
Source: Logistics Bureau
Benefits of a U-Shaped Design
1. Forward staging area: Because of the proximity of the docks to one another, this design is a boon to the idea of a forward staging area. For high volume items, set aside a space upfront (and close to both docks) that will speed up both functions and keep high velocity items moving in and out quickly.
2. Organize your storage more efficiently: In a U-shaped design, the “exterior lane” of the layout, which tracks along the walls rather than interior, should be your fast moving materials or product, preferably those that aren’t fragile. Maintaining this “fast lane” prevents bottlenecks when others are attempting to move items that need more care or are heavier. Those items can be stored on the interior lane. This dual track ensures speed and efficiency in the picking process.
3. Better staff utilization: Because of the movement principles involved here and the shared docking space, you can be successful with a smaller team.
4. Maximized space: Again, the shared dock is key here. The staging areas are shared, thus there’s more storage space. Similarly, because goods can be moving in and out simultaneously, even more quickly, you’re freeing up vital storage space.
The L-Shaped Design
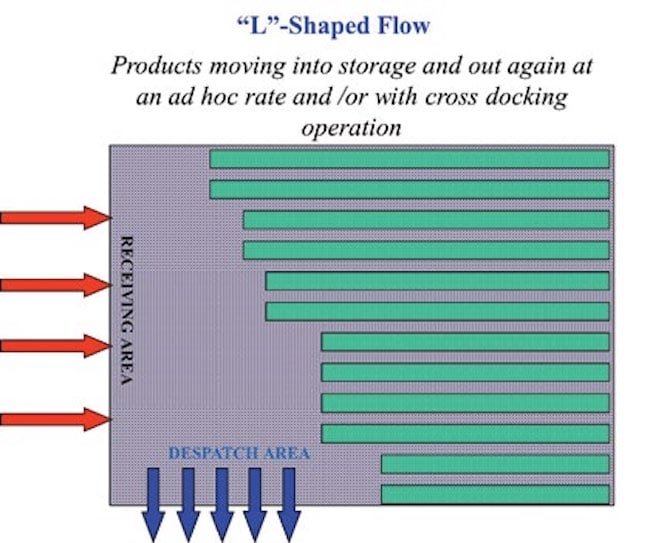
Alternatively, there is the L shaped for use when loading docks are located near one another. The L-shaped warehouse layout are designed for operations that receive on one side and dispatch on the adjacent side.
Source: Logistics Bureau
Additionally, it provides more space in the shipping and receiving areas for sorting and storage. However, this design requires more space and more product movement, potentially increasing risk of damage and worker injury.
Benefits of the L-Shaped Design
1. More space for storage: Given the fact that you are separating loading and reception from the picking areas, you have more room to keep your inventory stored.
2. Keep teams focused: Your team members can do their tasks in their respective areas. Meaning those in loading and receiving can stay in their section, while your team who oversees inventory and fulfillment are well equipped to complete their tasks in their respective area, encouraging each team to stay focused on their own segment.
The I-Shaped Design
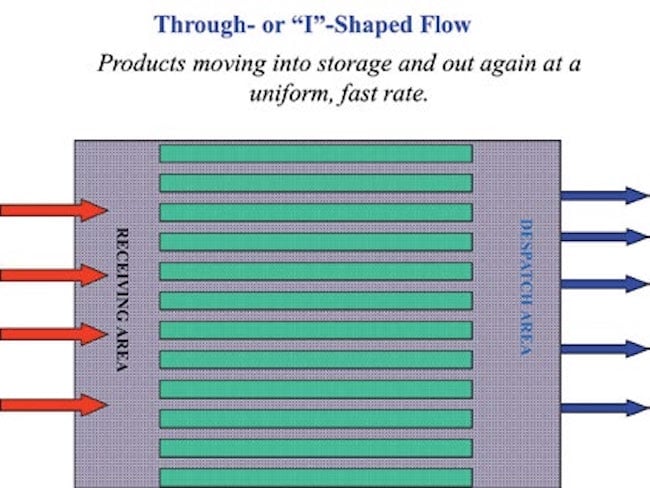
The I-shaped layout is ideal for businesses that receive on one end and dispatch on the other side of the building.
Source: Logistics Bureau
Benefits of the I-Shaped Design
1. Move more volume: Much like the U-shape that allows for a fast lane and a slow lane, this setup utilizes the full length of the warehouse space, enabling two lanes for each speed (coming and going). As such, you can move goods in and out at the same time and quickly.
2. More available bays: Because you loading docks aren’t sharing space, you can include more than one bay, meaning you can load/unload more than one truck at a time. Decreasing the wait time for your transit partners helps them get on the road more quickly and it saves them idling fuel.
3. Greater focus: With separate shipping and receiving areas, your team members can focus on the segments and functions they are tasked with. Rather than attempting, at times, to multitask, a team member can focus on inventory and another on fulfillment, optimizing their accuracy.
4. Security: With separate docks, it’s far easier for a security team or individuals to monitor access as there is less activity and less confusion about the direction of goods.
The Fishbone Design
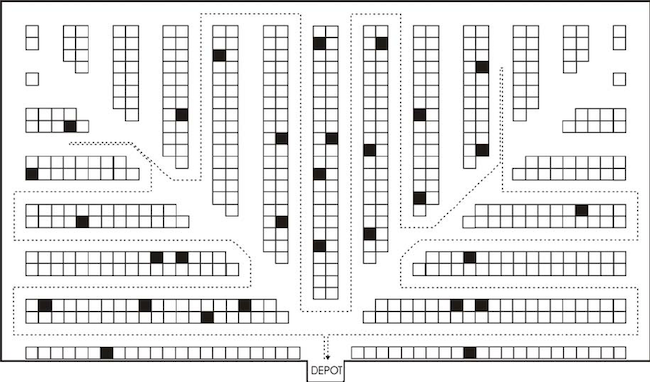
Finally, there’s the fishbone design which angles some, or all, aisles which may reduce travel times by up to 20%. While this layout also requires more space, costs can be recouped through the efficiency of pallet delivery.
Source: ResearchGate
Benefits of the Fishbone Design
1. Cuts down travel: As mentioned above, because pickers don’t have to follow a circuitous or scenic route, passing all other items on their way, they can move as they need to, down the central aisle or down angles or around the outside. As a result, they get where they are going more quickly. In part, this has to do with the elimination of the 90 degree turn, which slows many forklift drivers down. Aisles rest on 45 degrees, meaning smoother turning.2. Maximizes efficiency and saves costs: Obviously, the decreased travel times mean your pickers can move to and from loading docks faster, delivering goods more quickly, resulting in increased efficiency. This translates into cost savings. In fact, there’s a handy tool to let you figure out just how much you can save using this method.
How CAVU ERP Helps You in Your Warehouse and Beyond
Regardless of the warehouse design you choose, you want to partner with a company that can give you warehouse-to-front-counter consolidation. You need software that can not only help you track your inventory across its entire journey, but also enable you to maximize your storage and stocking through accurate forecasting based on real data.
If you’re looking for ways to maximize your space, you want to look at your layout. To truly maximize your efficiency and improve your inventory management, come to CAVU. Get in touch with our team today so we can discuss how our ERP software can help.

